


| The Lynx
ProjectLincoln-Mercury’s Lost Dream Car |
|
|
This long story started with an e-mail from my dear friend Ken Kitchen, saying that there was a post on HH message board, requesting dioramists for a project, lead by all modelers’ dear Mark S. Gustavson.
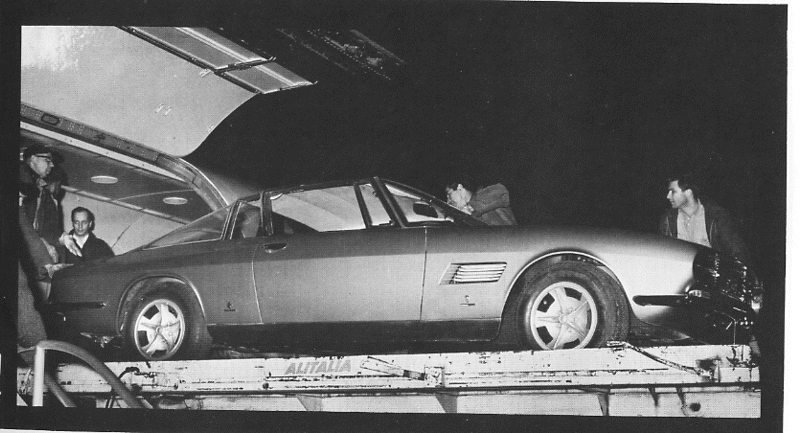
Although being far away from the “headquarters”, I immediately dropped a volunteering message to Mark S. Gustavson, because participating in such a project would be a big honor. And deep thanks to him, he had some concept for me. This was the depiction of 3 Bertone prototypes being unloaded from the Alitalia cargo plane. And the only evidence we had was a single photograph taken from 1965 Automobile Quarterly magazine. So now there was a big quest ahead, for getting details.
There was an argument of how big and detailed the
diorama would be. The consensus was that, the nose part of the plane
should be avoided, as well as the landing gears and if possible, the
wing. So I made a couple of sketches and one was agreed on. The base
will have 3 walls, the one behind the fuselage being fixed, and the
other adjacent two being removable, for providing access to various
angle shootings. The walls will be flat black, depicting the darkness
of the night in the background.
Now, I have more than 130 photos of DC-8 cargo
planes, their insides and door details, and dimensions (Thanks to Mike
Swan for his endless info hunt). And about 25 pics of scissors jacks,
to figure out the construction. This many may seem to be over needed in
general, but there may be one detail in one photo, that can’t be seen
in the others. That’s why I have collected so many photos.
November 2003:
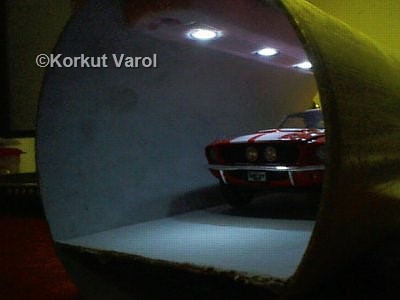
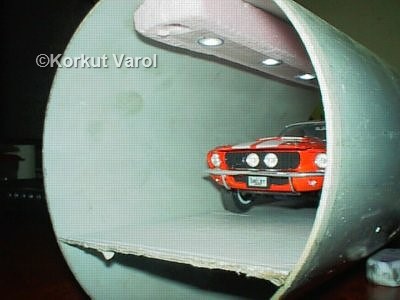
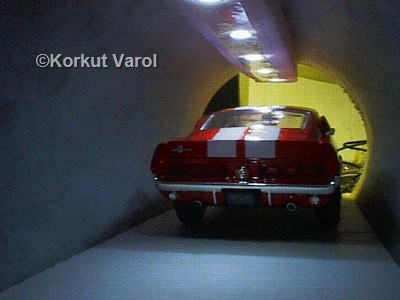
One detail I was after was, illuminating the inside of the cargo plane, to enable taking pics from inside the fuselage. I made a very quick depiction prototype of how the ceiling lighting would be. From our AQ photo, it was seen that there are dome lightings along the fuselage, estimated to be with a 1 meter (3.3 ft) pitch. I found a PVC pipe 5" diameter (though smaller than 1/25) and 10" long and used it as the fuselage part. The distance from the lights to the floor was made to scale, in order to see the true lighting intensity.
I bought 5 white LEDs with metal housings and placed them in a ceiling panel. These LEDs can be loaded up to 4.5V, I applied 3V. The first result was like 5 floodlights, which I didn't like, so I put pieces of tracing paper in front of the LEDs to dissipate the light.
I was much pleased to see that even with close flashlight, the lights are seen as being on. So, I decided to install operating dome lights in the plane.
Below are the photos about this experiment, captured without and with a flashbulb consequently:
I will put a rheostat for adjusting the intensity. I am thinking of putting the battery pack/rheostat pair on the back side of the fixed wall, behind the fuselage.
I am also thinking of the scissors jack to be with adjustable height, by introducing some friction within the hydraulic cylinder/piston pair. I will do that too, if I don't encounter any unpredicted problem by now. This will most probably require that the mechanism be built from brass, to withstand pin joint forces during height adjustments. Then I went on with manufacturing the scissors jack.
| GO TO : | |||
| BUILDING THE DC-8 PLANE | BUILDING THE SCISSORS JACK | BUILDING THE LADDER | FINISHED PHOTOS |
